Have you ever shared a blog post link in an email or on social media and cringed a little at how ugly it looked?
Something like:
yourdomain.com/2024/03/15/the-ultimate-beginners-guide-to-seo-for-small-businesses/?ref=newsletterYeah. Nobody wants to click that. Nobody wants to type that. And honestly? It doesn’t do your brand any favours either.
That’s exactly why learning how to create a vanity URL in WordPress is one of those small things that makes a surprisingly big difference — for your brand, for your click-through rates, and even for your SEO.
In this guide, I’ll walk you through everything: what a vanity URL actually is, why it matters, and four different ways to create one in WordPress — from the simplest no-code approach to more advanced methods for developers. By the end, you’ll be able to set up clean, branded URLs for any page, post, campaign, or affiliate link on your site.
Let’s get into it.
What Is a Vanity URL in WordPress?
Before we get into the how-to, let’s make sure we’re on the same page about what we’re actually building here.
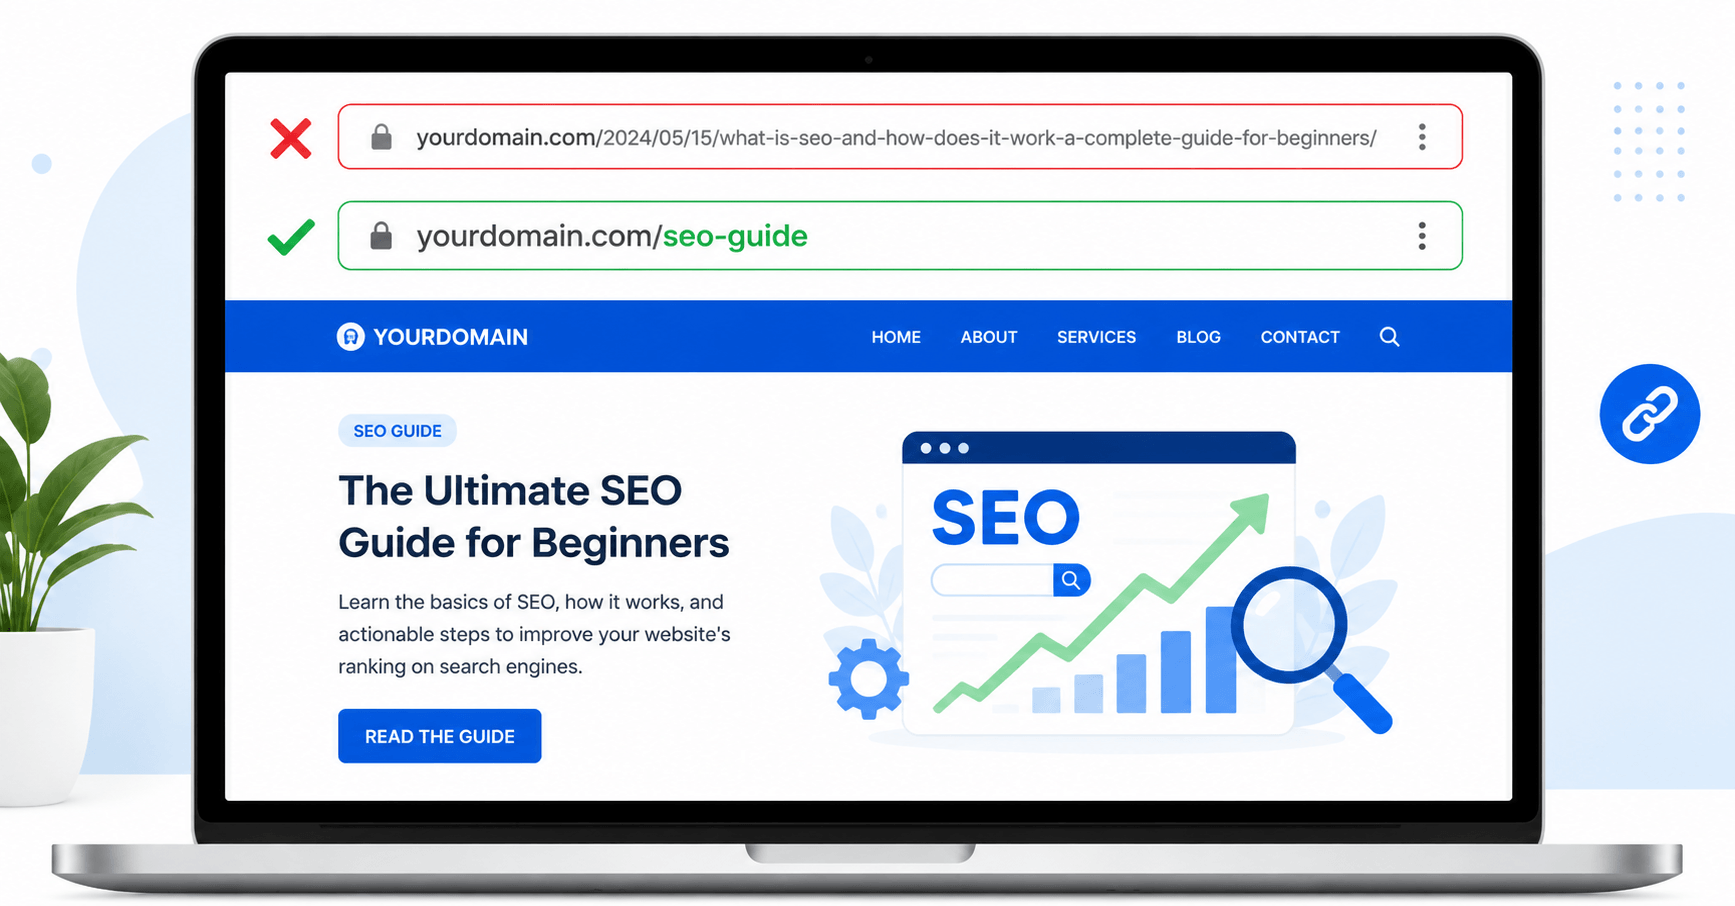
A vanity URL in WordPress is a short, clean, branded web address that redirects users to a longer or more complex destination URL. Instead of sharing a messy link full of numbers, dates, and query strings, you create a simple, memorable one that represents your brand or campaign.
Here’s a quick example to make this concrete:
| URL Type | Example |
|---|---|
| Default WordPress URL | yourdomain.com/?p=4521 |
| Standard permalink | yourdomain.com/blog/ultimate-seo-guide-for-beginners-2026/ |
| Vanity URL | yourdomain.com/seo-guide |
See the difference? The vanity URL is short, clean, and instantly tells you what you’ll find when you click it.
What is a vanity URL in WordPress used for? Here are the most common real-world use cases:
- Marketing campaigns — Share
yourdomain.com/blackfridayin emails, ads, and social posts instead of a long product page URL - Affiliate links — Turn ugly affiliate URLs with tracking codes into branded links like
yourdomain.com/go/hostinger - Print and offline media — URLs on flyers, business cards, and presentations need to be short enough to actually type
- Social media sharing — Clean URLs get clicked more often and look more trustworthy in feeds
- YouTube or podcast mentions — “Go to mydomain.com/freetemplate” is far easier to remember than anything 70 characters long
The concept of a vanity URL in WordPress is simple: it’s a redirect. You create a short, pretty URL, and whenever someone visits it, WordPress quietly sends them to the real destination. The visitor never sees the long URL — they just land where they’re supposed to go.
How to Create a Vanity URL in WordPress : 4 Methods
There are four solid ways to create a vanity URL in WordPress, ranging from beginner-friendly to developer-level. I’ll walk through each one so you can pick the right approach for your situation.
Method 1: Edit the Permalink Directly in the WordPress Editor (Simplest)
This is the easiest way to create a vanity URL in WordPress and requires zero plugins. Every time you create a post or page, WordPress automatically generates a URL based on the title. You can change that URL to anything you want right inside the editor.
When to use this method: Best for pages and posts where you want a clean, permanent URL that becomes the page’s actual permalink — not a redirect.
Step-by-step:
Step 1: Log in to your WordPress dashboard and open the post or page you want to edit (or create a new one).
Step 2: Look at the top of the editor. Just below the title field, you’ll see the current URL with an Edit button next to it. Click Edit.
Step 3: Clear the existing slug and type in your new vanity URL slug. For example, if your page title is “The Complete Beginner’s Guide to WordPress SEO 2026,” you might change the slug to simply seo-guide.
💡 Quick tip: Keep your slug lowercase, use hyphens between words (not underscores), and avoid special characters. So
/seo-guide— not/SEO_Guideor/seo guide.
Step 4: Click OK to confirm the slug, then click Update or Publish to save the page.
That’s it. Your page is now accessible at yourdomain.com/seo-guide instead of the original long URL.
Important note: If your page is already published and ranking in Google, changing the permalink will break any existing backlinks and search rankings for that URL. Always set up a redirect from the old URL to the new one if the page already has traffic. (Method 3 below covers how to do that.)
Method 2: Using the Pretty Links Plugin (Best for Affiliate Links and Campaigns)
If you want to create a vanity URL in WordPress that works as a redirect — meaning the original URL stays the same but you have a clean short link that points to it — the Pretty Links plugin is one of the most popular tools for this.
It’s especially beloved by affiliate marketers because it lets you turn messy affiliate URLs into clean branded links.
When to use this method: Best for affiliate links, campaign-specific URLs, and short links you want to track individually.
Step 1: Install and activate Pretty Links
Go to Plugins → Add New, search for “Pretty Links,” install, and activate it. The free version is enough for most use cases.
Step 2: Create a new link
Go to Pretty Links → Add New Link in your WordPress dashboard.
Step 3: Fill in the details
- Target URL: Paste the full destination URL (the long affiliate link, campaign page, etc.)
- Pretty Link: Type in your desired slug — for example,
go/hostingerordiscount/seo-tool - Redirect Type: Leave this as 301 (permanent) for most cases. Use 302 (temporary) if the destination URL might change.
Step 4: Save the link
Click Save. Your vanity URL is now live. Anyone who visits yourdomain.com/go/hostinger will be instantly redirected to the full affiliate URL.
What makes Pretty Links worth using:
- Each link has its own click counter so you can track performance
- You can group links by category
- You can set expiry dates for time-limited campaigns
- The Pro version adds A/B testing, more redirect types, and advanced reporting
💡 Real example: Instead of sharing
https://tracking.hostinger.com?ref=yourname&campaign=may2026&source=email, you shareyourdomain.com/go/hostinger. Same destination, but it looks professional, builds trust, and is easy to remember.
Method 3: Using the Redirection Plugin (Best for Redirects and Link Management)
The Redirection plugin is the most powerful free option for managing vanity URLs and redirects in WordPress. Unlike Pretty Links (which focuses on link cloaking and affiliate use), Redirection is designed for handling URL redirects at scale — including fixing broken links, managing permalink changes, and creating campaign-specific vanity URLs.
When to use this method: Best for managing multiple redirects, fixing broken links, handling permalink migrations, and creating vanity URLs that need logging and tracking.
Step 1: Install and activate the Redirection plugin
Go to Plugins → Add New, search for “Redirection” (by John Godley), install, and activate it. Follow the setup wizard on first activation.
Step 2: Go to Tools → Redirection
This opens the Redirection dashboard where you can see and manage all your redirects.
Step 3: Add a new redirect
In the “Add new redirection” form at the top:
- Source URL: Enter your vanity URL slug — for example,
/dealor/free-ebook - Target URL: Enter the full destination URL where you want visitors to land
Step 4: Set the redirect type and save
Select 301 (permanent redirect) from the dropdown and click Add Redirect.
Your vanity URL is now active. Visit yourdomain.com/deal and you’ll be automatically sent to the destination.
Bonus features that make Redirection worth using:
- Automatic 404 detection — when someone visits a broken URL, Redirection can log it and let you create a redirect to fix it
- Import/export — move all your redirects between sites easily
- Logging — see exactly how many times each redirect has been accessed
- RegEx support — create dynamic redirect rules for advanced use cases
- Rank Math and Yoast integration — if you already use either of these SEO plugins, they include a built-in redirect manager that works similarly
Method 4: Using .htaccess (For Developers and Advanced Users)
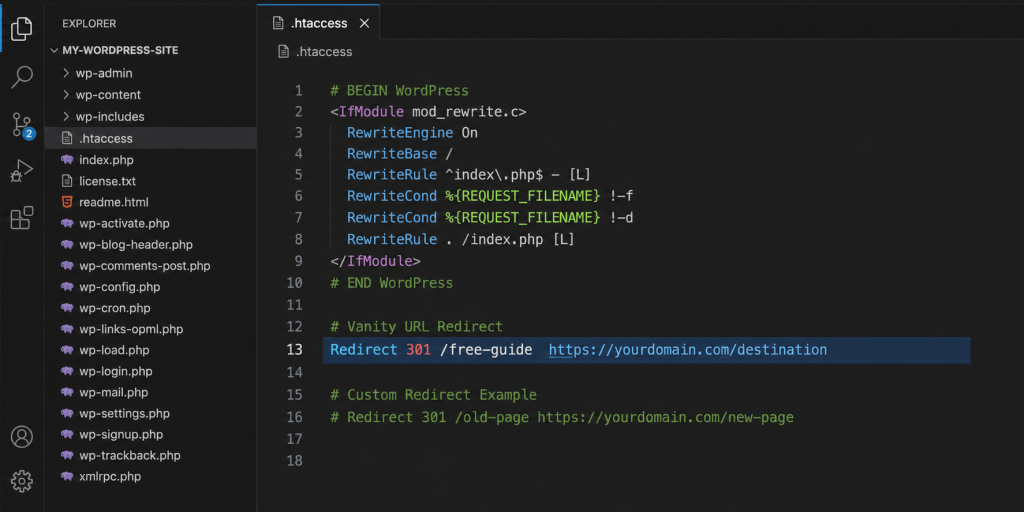
If you’re comfortable with server-level files, you can create a vanity URL in WordPress by directly editing your .htaccess file. This is the most lightweight approach — no plugin needed, no database queries, just a server-level rule.
When to use this method: Best for developers, high-traffic sites where plugin overhead matters, or situations where you need server-level control.
Step 1: Access your .htaccess file
You can do this through:
- Your hosting control panel’s File Manager (look in the root directory of your site)
- FTP with a client like FileZilla
- Rank Math’s built-in htaccess editor (Rank Math → General Settings → Edit .htaccess)
Step 2: Add your redirect rule
Add this line inside your .htaccess file, before the WordPress default block:
Redirect 301 /free-guide https://yourdomain.com/the-complete-beginners-guide-to-wordpress/Change /free-guide to your desired vanity URL slug, and the destination to your full target URL.
Step 3: Save and test
Save the file, then visit yourdomain.com/free-guide in your browser to confirm the redirect works.
⚠️ Important warning: Even a tiny syntax error in
.htaccesscan make your entire site inaccessible. Always create a backup of your.htaccessfile before making any changes, and test immediately after saving.
When to use functions.php instead:
For WordPress-specific redirects, you can also add redirect logic to your theme’s functions.php file:
function my_custom_vanity_redirects() {
    if ( strpos( $_SERVER['REQUEST_URI'], '/free-guide' ) !== false ) {
        wp_redirect( home_url( '/the-complete-beginners-guide-to-wordpress/' ), 301 );
        exit;
    }
}
add_action( 'template_redirect', 'my_custom_vanity_redirects' );
💡 Developer tip: Always add custom redirect code to a child theme or a custom plugin — never directly to a parent theme’s
functions.php, because theme updates will erase your changes.
Which Method Should You Choose?
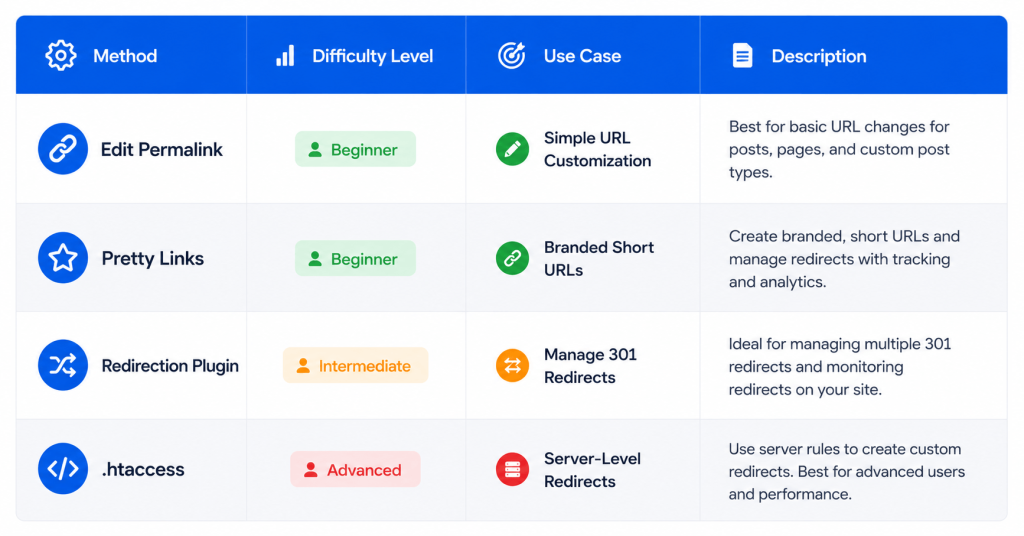
Not sure which approach fits your situation? Here’s a quick comparison:
| Method | Best For | Technical Level | Cost |
|---|---|---|---|
| Edit Permalink in Editor | Blog posts, landing pages | Beginner | Free |
| Pretty Links Plugin | Affiliate links, campaign tracking | Beginner | Free + Pro |
| Redirection Plugin | Multiple redirects, broken links, link management | Beginner–Intermediate | Free |
| .htaccess / functions.php | Developer use, high-traffic sites | Advanced | Free |
For most WordPress site owners, the Redirection plugin or Pretty Links will cover everything you need. The permalink editor is perfect for one-off clean URLs on individual pages.
Best Practices for Creating Vanity URLs in WordPress
Knowing how to create a vanity URL in WordPress is the first step. Using them well is the second. Here are the practices that separate good vanity URLs from great ones:
✅ Keep it short — 2 to 4 words maximum
The whole point of a vanity URL is that it’s easy to say, type, and remember. /ultimate-guide-to-wordpress-seo-optimization-for-beginners defeats the purpose. /wordpress-seo is the goal.
✅ Use hyphens, not underscores
Google recommends hyphens to separate words in URLs. yourdomain.com/seo-guide is better than yourdomain.com/seo_guide for both readability and search engine interpretation.
✅ Lowercase only
Always use lowercase letters in URL slugs. Some servers treat /SEO-Guide and /seo-guide as different URLs, which can cause duplicate content issues.
✅ Include a keyword where it makes sense
If you’re creating a landing page for a guide about WordPress speed, /wordpress-speed-guide is more SEO-friendly than /resource-1. Don’t force keywords, but use them naturally when they fit.
✅ Be consistent with your naming pattern
If you use yourdomain.com/go/toolname for affiliate links, stick to that pattern across all your affiliate links. Consistency makes management much easier as your list grows.
✅ Always use 301 redirects, not 302
A 301 redirect tells search engines the move is permanent and passes link equity to the destination. A 302 is temporary — it doesn’t pass authority and can confuse search engines over time. Unless you genuinely need a temporary redirect, always use 301.
✅ Test your vanity URL immediately after creating it
This sounds obvious but gets skipped often. Open an incognito browser window and visit your vanity URL to confirm it redirects correctly. Check that the final destination is the right page, not a 404.
Common Mistakes to Avoid
Even when you understand how to create a vanity URL in WordPress, these mistakes can undermine your work:
❌ Changing vanity URLs after they’ve been indexed by Google Once a URL is ranking in search results and has backlinks pointing to it, changing it without setting up a proper 301 redirect will result in traffic loss. If you must change it, always redirect the old URL to the new one.
❌ Creating too many redirects in a chain A redirect chain looks like: /old-url → /new-url → /final-url. Each hop adds load time and dilutes link equity. Keep redirects direct — one URL pointing to the final destination.
❌ Using generic slugs that mean nothing /link1, /promo2026, /campaign-a — these are forgettable and unhelpful. Even campaign-specific vanity URLs should include a word that describes what they’re for.
❌ Not tracking performance If you created a vanity URL specifically for a campaign and never check how many clicks it got, you’re leaving valuable data on the table. Use the click tracking in Pretty Links or Redirection, or add UTM parameters to the destination URL.
❌ Ignoring mobile users A vanity URL printed on a flyer that someone tries to type on a phone needs to be short and contain no tricky characters. Test every vanity URL you create by typing it manually on a mobile device.
Final Thoughts
Now you know exactly how to create a vanity URL in WordPress — and more importantly, why it’s worth doing.
Whether you’re an affiliate marketer who wants cleaner referral links, a business owner promoting campaigns across print and social media, or a blogger who wants more professional-looking permalinks — vanity URLs are a small investment of time that pays off consistently.
Start simple. Pick one page or campaign, create a clean vanity URL using whichever method fits your comfort level, and see how it feels to share a link you’re actually proud of. Once you get the hang of it, you’ll start finding places to use them everywhere.